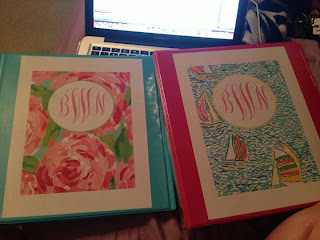
A couple of days ago I was on Etsy and saw some of the cutest Lilly Pulitzer monogrammed binder covers. I was considering buying them but decided that I should try to make them. The process is pretty easy once you get the hang of it and I don't think that mine turned out too bad for the first time! I am sure there is an easier way but this is how I did it.

- So the first step I would say is to go to dafont.com and download the font Monogram KK. Then if you have a PC extract the file. If you are using a mac then you can skip that. Then you need to drag those files into you font folder. For PC users that will be in your control panel. Mac users can find it in the Launchpad in the "Other" folder.
- Next you need to decide what background you want and go ahead and download them into a folder.
- Now it is time to open a Microsoft word document.
- Next you need to go to "Layout" then color then fill effects.
- After you push "fill effects" Go over to picture and select the picture that you want for the background.
- After you select OK it should fill your background.
- Now the next step is to add the shape you want your monogram in.
- Go to "Home" then "Insert" the "Shapes" and choose the shape you want.

9.After you select your shape move drag it to move it around and make it the size you want. You can right click and "Format Shape" to give it a glow like you see in mine or customize it more.
10.Now it is time to add the text. You can do this by adding word art or a text box. I would do this separately for each letter in the monogram. I made the smaller letters font size 175 (which you have to type in because it's not an option) and the last initial size 275. Now select the initial in the middle(typically your last name initial) and right click for options. Then push "Arrange" and send back that letter. You can of course change your font color!
VIOLA now you have a monogrammed binder cover! Now it is time to print! If you have a messed up printer like mine then it might not show the background. If this occurs... change your zoom size to fit the whole page then print scan (PC) or push "shift""command""3" at the same time for Mac. Crop the picture and then you can print it that way! Whatever works for you.
Don't worry you do not have to repeat that whole process ever again because now all you have to do is change the background picture and maybe some minor color details to make another one!
If you struggle with this you can email me BWoodman14@gmail.com and I will assist you further or I can even just send you my binder cover where you can change the initials!!
Best of luck and I hope this makes sense because I typed this pretty fast! Please don't hesitate to contact me if you have a problem!
